
Sitecore 9 is moving towards a micro-service based architecture and is designed with the cloud in mind. The community has picked this development up by creating Docker images for Sitecore. This works great for local development, but it still has some challenges when deploying to the cloud. This changed with the recent introduction of Windows support for Kubernetes (K8S) and Azure Kubernetes Service (AKS) support for Windows containers.
This article introduces a Kubernetes setup, using Sitecore XC 9.1 as showcase, that allows you to deploy to AKS.
Sitecore XC 9.1 topology
Let's first have a look at the Sitecore XC 9.1 topology. The below diagram gives an overview of all the services and databases for a basic XC 9.1 setup.

These services are mapped to several Docker images, this mapping is as follows;
- Content Management & Content Delivery are combined in a Sitecore Docker image
- Business Tools and the Commerce Engine roles are grouped in a Commerce Docker image
- The Identity Server has its own Docker image, named Identity
- XConnect and its Processing part are placed in a XConnect Docker image
- All SQL database are present in a Mssql image
- All Solr cores are placed in a Solr image
These 6 Docker images form the basis for running the containerized Sitecore XC system. Build the images using the instructions provided in your Github repository of choice, ie. sitecore/docker-images or avivasolutionsnl/sitecore-docker. After building the images push them to a Docker Registry, e.g. Azure Container Registry, such that they can be pulled and used to create containers when deploying to AKS.
Azure Kubernetes Service
Now that we have a basic overview of a containerized Sitecore XC setup, lets look at Azure Kubernetes Service (AKS). We run two types of nodes; a Linux and Windows node. The Linux node is used to run the Kubernetes services, and the Windows node is used for running the Sitecore Windows containers. A basic AKS cluster and its infrastructure is depicted below.
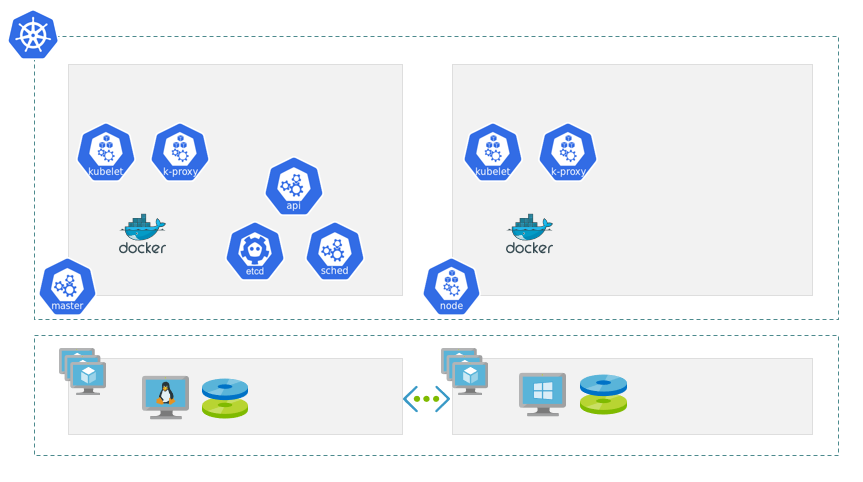
At the bottom we have the infrastructure for our cluster. It consists of a Linux and Windows VM connected to eachother using a virtual network.
On top of this infrastructure the Kubernetes cluster is created. The cluster consists of a master Linux node and a (slave) Windows node. Each node runs a number of default services;
- kubelet, which is the primary node agent
- k-proxy, the network proxy that e.g. handles communication between nodes
- Docker Moby as container runtime
On the master node some additional services are running;
- api, which is the Kubernetes server
- etcd, this is the Kubernetes configuration store
- scheduler, the service in charge of placing Pods in the cluster
Setup AKS cluster
With this understanding of an AKS cluster its time to get hands-on and setup an empty hybrid (Linux & Windows nodes) Kubernetes cluster. After installing the Azure CLI tooling;
Create a resource group
PS> az group create --name $ResourceGroup --location $LocationCreate a Kubernetes cluster with one Linux node (and already specify the Windows credentials needed to run Windows containers)
PS> az aks create --resource-group $ResourceGroup `
    --name $ClusterName `
    --node-count 1 `
    --enable-addons monitoring `
    --kubernetes-version 1.14.5 `
    --generate-ssh-keys `
    --windows-admin-password $WindowsPassword `
    --windows-admin-username $WindowsAdminUser `
    --enable-vmss `
    --network-plugin azure
Add a Windows Server node to the cluster
PS> az aks nodepool add --resource-group $ResourceGroup `
    --cluster-name $ClusterName `
    --os-type Windows `
    --name npwin `
    --node-count 1 `
    --kubernetes-version 1.14.5
That's basically all to get a hybrid AKS cluster up and running! More detailed steps, e.g. how to connect ACR to your cluster, are described here.
The movie below recaps the steps above and shows some basic commands to inspect your cluster.
Deploy Solr to AKS
Now that we have an empty AKS cluster up and running, lets see what it takes to deploy a single service. We choose Solr as use-case as its a backend service with no dependent services. It requires some persistent storage, which is later required by more services. And it does not require any special configuration (e.g. runs HTTP out-of-the-box).
The Kubernetes YAML spec file for Solr looks as follows:
apiVersion: apps/v1
kind: Deployment
metadata:
  name: solr-deployment
  labels:
    app: solr
spec:
  replicas: 1
  selector:
    matchLabels:
      app: solr
  template:
    metadata:
      labels:
        app: solr
    spec:
      nodeSelector:
        "beta.kubernetes.io/os": windows # Run on a Windows Node
      containers:
      - name: solr
        image: avivasolutionsnl.azurecr.io/sitecore-xc-solr:9.1.0-20190904
        ports:
          - containerPort: 8983
        volumeMounts:
          - mountPath: "/Data"
            name: volume
      volumes:
        - name: volume
          persistentVolumeClaim:
            claimName: solr-managed-disk
---
apiVersion: v1
kind: PersistentVolumeClaim
metadata:
  name: solr-managed-disk
spec:
  accessModes:
  - ReadWriteOnce
  storageClassName: managed-premium
  resources:
    requests:
      storage: 5Gi
---
apiVersion: v1
kind: Service
metadata:
  name: solr
spec:
  ports:
  - protocol: TCP
    port: 8983
  selector:
    app: solr
---
apiVersion: extensions/v1beta1
kind: Ingress
metadata:
  name: solr
  annotations:
    kubernetes.io/ingress.class: nginx # Use Nginx as Ingress controller
    kubernetes.io/tls-acme: 'true' # Auto-generate SSL certificates and off-load SSL
spec:
  tls:
  - hosts:
    - solr.xc9-k8s.rocks
    secretName: tls-secret-solr
  rules:
  - host: solr.xc9-k8s.rocks
    http:
      paths:
      - backend:
          serviceName: solr
          servicePort: 8983
        path: /
As you can see it consists of 4 parts;
- Deployment
- PersistentVolumeClaim
- Service
- Ingress
The Deployment part defines which Docker image to use (it uses the XC Solr Docker image from the Aviva ACR) and that this Pod should run on a Windows node, and it mounts persistent volume into the /Data path.
Next the PersistentVolumeClaim describes to allocate 5 Gi of Azure managed-premium storage.
There is a Service spec that abstracts the Solr Deployment into a network service. A Service for example enables load-balancing over multiple Pods.
Finally there is an Ingress spec that defines to use Nginx as Ingress controller, auto-generates SSL certificates and perform SSL-offloading, uses solr.xc9-k8s.rocks as DNS name (and configure this automatically as Ingress route), and finally it maps incoming HTTP requests to the service named solr on port 8983.
The desired stated described in the K8S YAML spec can be applied as follows:
PS> kubectl apply -f ./xc9/solr.yamlAfter the persistent storage is allocated, this takes a little while, the Pod is started and you should be able to browse to https://solr.xc9-k8s.rocks
Watch below movie to see how applying the K8S Solr spec works out in practice:
Deploy Sitecore XC 9.1 to AKS
Next step is to deploy the full Sitecore XC 9.1 setup. This involves basically the same steps as shown for Solr, plus some configuration for;
- Sitecore, configure the site settings
- Identity, configure CORS settings, apply a small patch to enable reverse-proxy support see here
- Commerce, configure CORS settings
All K8S YAML spec files for Sitecore XC 9.1 can be found here.
Besides this we will need to supply a Sitecore license file. We will use a Kubernetes secret, which is a special type of config, to mount the license file in the containers.
To create a K8S secret from a license.xml file do:
PS> kubectl create secret generic sitecore-license --from-file=license.xmlThis creates a secret named sitecore-license and uploads license.xml into it.
To verify the contents of sitecore-license:
PS> kubectl describe secrets sitecore-licenseNow that we a secret available we can mount it into the Sitecore, Identity, and XConnnect containers by adding the following snippet to the K8S YAML spec files:
...
    container:
        ...
        volumeMounts:
            - mountPath: "/license"
                name: license
                readOnly: true
    volumes:
        - name: license
            secret:
                secretName: sitecore-license
You can find all spec files here.
Now everything is set up to, apply all XC 9.1 spec files (located in the xc9 directory) in once:
PS> kubectl apply -f ./xc9Wait a bit till all Pods are up and running. You can monitor the progress using:
PS> kubectl get pods -wIn the meantime you can also inspect the Ingress controller by performing:
PS> kubectl get ingOnce all Pods are up and running e.g. navigate to https://www.xc9-k8s.rocks to verify that everything works.
A fully detailed description of what to configure can be found here.
Want a visual impression of how it all works? Watch the following movie..
Scale
Till now we have seen how to create a cluster, deploy a service, provision storage, and configure a secret. This all works pretty smooth with Kubernetes, but the real power of K8S is best shown by its scaling features. Kubernetes allows you to horizontally scale the number of Nodes or Pods.
In this example we will look at how to use the Horizontal Pod Autoscaler (hpa) to scale the number of Commerce Pods. We plan to scale the number of Commerce Pods from 1 to 3 depending on the CPU load.
First thing is to specify the resources to allocate per Pod. For the Commerce Pod will apply the following:
containers:
    - name: commerce
    resources:
        requests:
            cpu: 500m # 50% of 1 vCPU
        limits:
            cpu: 500m
Above states that the container requests at least and at most 500 milli CPU (i.e. 50% of 1 vCPU).
Next we will add a HorizontalPodAutoscaler spec to the Commerce YAML file:
apiVersion: autoscaling/v2beta2
kind: HorizontalPodAutoscaler
metadata:
  name: commerce
  namespace: default
spec:
  scaleTargetRef:
    apiVersion: apps/v1
    kind: Deployment
    name: commerce-deployment
  minReplicas: 1
  maxReplicas: 3
  metrics:
  - type: Resource
    resource:
      name: cpu
      target:
        type: Utilization
        averageUtilization: 50 # Target is 50% of the requested CPU, i.e. 50% of 500 milli CPU in this case
Above spec requests to add a Pod when the CPU load for the allocated Pods, which is initially the minimum of 1, goes above 50% of the requested 500 milli CPU. Note that CPU is just one of the metric types you can choose.
To apply load to the system we will perform a simple load-test using K6 Loadimpact. Finally we need an actual webshop to apply the load to. We will use the Mercury demo webshop for this. It is the easiest solution since its offers a pre-configured Dockerized Sitecore XC 9.1 webshop.
Mercury is a Sitecore Commerce accelerator.
Lets spin up the Mercury Demo webshop (find all K8S files for it here):
PS> kubectl apply -f ./scaleOnce the system is up and running, query the Horizontal Pod Autoscaler as follows:
PS> kubectl get hpaIt will indicate the average load that it measured for the Commerce Pod(s).
After start up there is possibly already more than one Commerce Pod running. Wait a bit till it cools down.
As load-test we will add a single product many times to the cart. The K6 script looks as follows (find it here):
import { check } from "k6";
import http from "k6/http";

export default function() {
    let payload = JSON.stringify({catalogName: "MercuryFood", productID: "4757660", quantity: null, variantDisplayValue: null});
    var params =  { headers: { "Content-Type": "application/json" } }
    let res = http.post("https://mercury-www.xc9-k8s.rocks/mercury/checkout/cart/add", payload, params);
    check(res, {
        "is status 204": (r) => r.status === 204
    });
};
To run this script for 60 seconds and 100 virtual users:
PS> docker run -i loadimpact/k6 run -u 100 -d 60s -< loadtest.jsNow inspect the Horizontal Pod Autoscaler:
PS> kubectl get hpaIf everything went well you will see that the load goes well beyond the configured average of 50%. Due to this the HPA will allocate more Pods.
You can get a full description of the HPA its actions by:
PS> kubectl describe hpaNote that the autoscaler by default queries every 15 seconds for metrics. When needed it will upscale the number of Pods. Downscaling Pods will happen after a (default) cool down period of 5 minutes.
You can find an even more detailed description of above steps in this README.
See Horizontal Pod Autoscaling in action:
Conclusion
Azure Kubernetes Service is the easiest way to deploy your Sitecore Docker containers to the cloud. Other options like Docker Swarm and Docker Desktop using VMs have less features, e.g. no automatic storage provisioning, and require more set up work and maintenance.
Creating service deployment specs and an AKS cluster can be done in under one hour, which is a good indication of the convenience AKS brings you.
The shown Sitecore XC 9.1 AKS setup is meant for development, until:
- it has centralized logging, e.g. Azure App Insights configured
- uses an Azure SQL managed database; its no good idea to run your own database containers in production
- AKS for Windows out of preview and thus generally available.
Try it for yourself: https://github.com/joostmeijles/xc9-k8s

© Joost Meijles 2019